
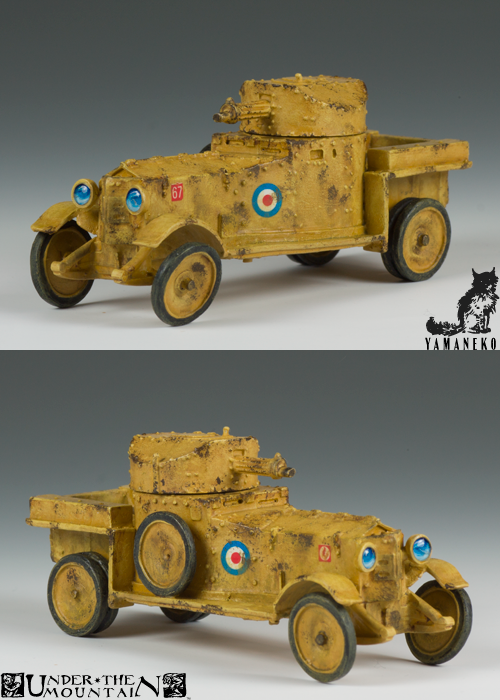
Download the painting guide for Copplestone Castings‘ Rolls-Royce 1920 Armoured Car in Letter and A4 formats. And if you’re so inclined, please vote on my model here.
Download the painting guide for Copplestone Castings‘ Rolls-Royce 1920 Armoured Car in Letter and A4 formats. And if you’re so inclined, please vote on my model here.
Posted in Uncategorized

Imbrian Arts recently published rules for a simple miniatures drinking game titled Beer & D6s and some miniatures to go with it. I’m not much of a gamer myself, but the models were so full of character that I snatched them up immediately after their release. (I’m also a sucker for any sculpt born from the mind and hands of Jody SIEGEL, but that goes without saying.)

The dwarf (left) and leg/torso options for the drunks
Featured here are a few models from the B&D6s range, namely the dwarf (see a close up here) and the drunks (above, below). The castings are flawless, thanks in part to the way Jody casts these (single-part mold), and the resin is high quality. The resin is also soft enough to be forgiving of minor twists and bends, so they should be strong enough to withstand the wear and tear of a gaming table, should that be how you intend to use them.
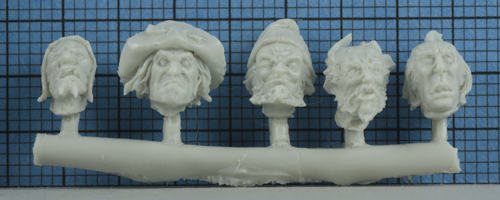
Head options for the BD6s drunks by Imbrian Arts
On another note, for those of you who may not have noticed, this is the reintroduction of my grid backdrop, which I traditionally used to present photos of miniatures straight from the box for review purposes. Expect to see more of such photos in the future. What I feature will probably be pretty random at first, but I’ll try to work out a schedule of sorts in the coming months. For the time being, I hope these photos help some of you with making a decision about these miniatures, introduce you to something new, or even just resolve some lingering questions you may have had about the models.
Posted in Uncategorized

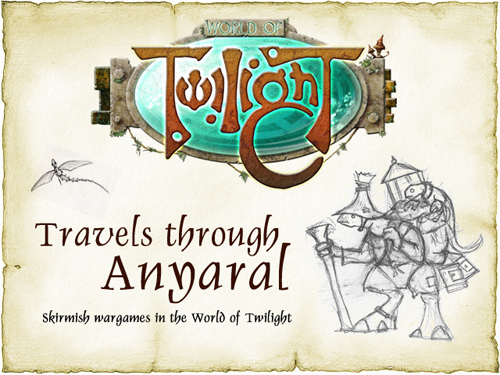
I’m currently backing three projects on Kickstarter: Shadows of Esteren: Tuath, COUNTERBLAST, and World of Twilight: Travels through Anyaral. None of these are mainstream brands, but based on the quality of their products and design alone they should be more well known than they are.
Shadows of Esteren is the most successful of this group. With three very successful Kickstarters under their belt, the Esteren team has built up a reputable brand and can rely on a strong customer base to propel their projects along at this point. I don’t foresee myself ever having time to actually play this RPG, but as an example of artistic design and deeply imaginative world-building, it has few contenders. In many ways it reminds me of the efforts Rackham put into similar products when they were still leaders of the avant-garde in this industry.
COUNTERBLAST. My preferences in miniatures have always been eclectic. I don’t obsess about a particular scale, probably because I rarely game, and I’ve never been particular about a single genre over the others. In recent years, however, I’ve noticed a growing trend toward historicals, pulp, and more old-school flavors. I’ve also started moving away from highly detailed miniatures in favor of models that are simpler in design. Currently, for example, I’m working on some Copplestone Back of Beyond and High Adventure models, a Crusader Miniatures Carthaginian army, Warlord Soviets, Flames of War Soviets, Gripping Beast/Ebob Normans, and Baueda Vikings for DBA. COUNTERBLAST appealed to me in part due to its apparent influence from Star Frontiers, which scratches a nostalgic itch, but also the simple yet characterful designs of the models, something that also distinguishes some of the models noted above.

World of Twilight. I first encountered Mike Thorp’s work when he won a sculpting contest on Frothers for his unique Traveling Court of the Brownie King model. I’ve been following his related Twilight project ever since. I was lucky to get one of the old Twilight starter kits when they were still available from Hasslefree, and have collected the odd model from his range from time to time. The Twilight Kickstarter has rekindled my interest in a big way, and I count myself lucky that I got in at the early bird level.


The latest episode of Game Glassy is ready for your listening pleasure.
Joe and Steve push it to the maxxxxx 90′s style this week as they cover explosions, energy drinks, and male beach volleyball. Well, actually they talk a lot of kickstarters including Arcadia Quest, Super Dungeon Explore, Vikings, Minotaurs, and T5 terrain. All this and Steve loses it over some meeples. P.S. T2: Judgement Day isn’t very Good.
Comments Off on PODCASTS, Game Glassy 56: “XTREME GAMING!!!”
Posted in Podcasts, Uncategorized
Tagged Game Classy
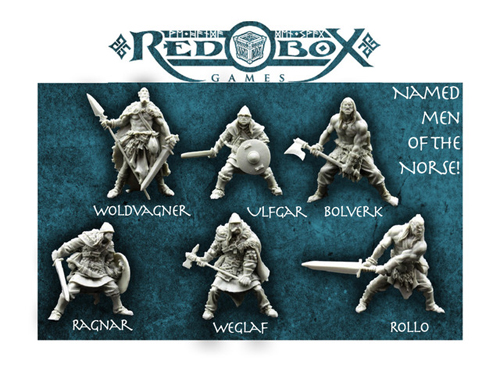
Red Box Games‘ Norse Warriors Kickstarter is down to the final hours at this point. This is definitely break the 10k mark this evening, but I’d love to see this end at least in the neighborhood of $15,000. It is an incredible deal for six models by one of the industries most talented artists; and your contribution will ensure that more of the same will follow.
Comments Off on RED BOX GAMES, Norse Warriors Kickstarter
Posted in 28-32mm fantasy, Kickstarter, Red Box Games, Uncategorized
Tagged Kickstarter, Red Box Games

Congratulations! You are now an official backer of Ogre Designer’s Edition.
I think I first heard about this project two years ago; my interest was piqued immediately then, and I backed the project almost as soon as the Kickstarter announcement was made.
I never played the first edition of OGRE or any of its later incarnations, but was keenly aware of the game when I made my first steps into the hobby. That was back in 1982; I was nine. I was far more drawn to D&D, Grenadier and Ral Partha miniatures, and board games like Dragon Pass, Dragonhunt, Circvs Maximvs, and The Trojan War (the latter by the same publisher as OGRE, Metagaming Microgames). I knew OGRE had a loyal following, but recall that I was strongly disappointed to find that the game had nothing to do with fantasy ogres. I’m happy to say I’ve since shed such prejudices.
Comments Off on SJG, Ogre Designer’s Edition
Posted in board games, Uncategorized
Tagged Kickstarter, OGRE, Steve Jackson Games
Anakron Miniatures Studio launched a new website recently.

Anakron’s new website is a testament to his high standards for aesthetics, functionality, and design. It’s a huge improvement over his last site, especially with respects to navigation (his famous tutorials, for example, are much more front and center now, and shouldn’t be missed).

There is a treasure trove of material on Anakron’s site, including links, galleries, and resources for painters and sculptors of all skill levels, but only for those with the highest regard for quality and presentation.

Don’t leave the Anakron Miniatures Studio site until you’ve thoroughly digested the repertoire of painted miniatures and sculpts on display, as it’s representative of some of the finest work in the industry. More importantly, don’t forget to visit Anakron’s boutique to pick up some models from his studio range of miniatures.

Comments Off on ANAKRON MINIATURES STUDIO, New Website
Posted in Anakron Miniatures, Uncategorized, Web sites
Tagged Anakron Miniatures Studio
Gerrie Schenck of Corvus’ Miniatures has uploaded a ton of great images from Painting Crusade 8.

Gerrie is has also started working on a great piece featuring the Rackham exclusive Souffre-Toile. I’m delighted to see this, as I’ve never seen a painted version of Souffre besides the one produced for the Rackham studio. It’s one of those models that most collectors are hesitant to paint due to its market value and scarcity. Kudos to Gerrie for taking the plunge and helping it realize its potential. I can’t wait to see the finished piece.

Comments Off on Painting Crusade 8 (2011), event coverage
Posted in Uncategorized

Imbrian Arts updated their Web site today with a preview of the artwork for the troll druid. The druid is part of a 10-model set of goblins, which is currently available for preorder from Imbrian. Anyone who preorders a full set of the goblins will receive a complementary print of the druid and another of one of the shrikes. These prints are only available as part of the preorder special, and will not be for sale later.
Comments Off on Imbrian Arts, druid art preview
Posted in Uncategorized

Box cover for the upcoming installment in the Dungeon Twister series of games
There’s a new version of Dungeon Twister on the way:
“Dungeon Twister Prison is coming in October to the US and Canada! In France and much of Europe, the game will be available late September or early October. Distributed by Asmodee worldwide.”
Apparently this will include rules for solo play as well. For more information see the official announcement, the countdown site for US release, and the BoardGameGeek entry.
Comments Off on Dungeon Twister 2: Prison
Posted in Uncategorized
by Hyun (weetoysoldiers.com)
Originally posted: September 19, 2005.
Last updated: February 27, 2007
Latest changes: Added some photos of painted miniatures that were primed with gesso.
Click here to jump to the new section. Click here to see the history of changes to this page and project.
September 19, 2005
I first came across gesso a few months ago on TheMiniaturesPage.com discussion forum. At once I was intrigued: Here was something that could be brushed on, was non-toxic, water-thinnable and water-washup, and works wonders as a primer? I must investigate!
I had primarily used spray-can varieties of primers, anything from hobby-specific like the Tamiya Gray Surface Primer, to the hardware store-variety like OSH or Krylon or Rustoleum Painter’s Touch. They all work well more or less, but, in my opinion, have a few major drawbacks. One, the weather and lighting condition has to be right — too much humidity or too windy or too late at night, and you’re out of luck. Second, and more importantly, the solvent- and lacquer-based primers have nasty, often carcinogenic, toxic chemicals that I’d rather do without. Third, unless you’re really careful, it’s easy to overapply the primer and end up with buried/obscured details.
Gesso is a thick-ish liquid surface preparatory compound used to prepare artist’s canvass before painting. It contains finely ground chalk with some sort of glue or binding agent. Different brands of gesso are made differently — apparently some carry carcinogenic warnings, and some are certified non-toxic. I’ve also read that it’s made of plaster of Paris with glue. Either way, it provides an excellent adhesive “tooth” for paint to grab onto. I’ve been priming miniatures with gesso for the past six months, and have been very pleased with results.
Now, the obvious down side is that it is brush-applied, and thus, somewhat time-consuming. This may not matter if you are a sloooooow painter like me, for whom the measure of progress and achievement is not the number of finished miniatures, but rather a happily cluttered workdesk full of miniatures in progress. I’ve heard of people asking about airbrushing gesso, but I honestly wouldn’t recommend it — the mix is thick enough to guarantee blocking and messing up your airbrush. And if you thin it to the point of being able to somewhat successfully airbrush it with an external-mix airbrush, then I would venture to guess that it would lack the cohesion to act properly as a primer.
The local craft stores carry Liquitex brand (the only brand I’ve used) of acrylic gesso in white, black, and clear. You can tint the white and clear gesso with inks or paints of your choice (well, you can lighten black gesso as well, I suppose, but most people will find it easier to go from white to darker than black to lighter). I started out with white gesso and tinted it with black craft acrylic paint, to give a nice, neutral grey look. I thin it with Tamiya airbrush thinner, but you can also use distilled water. Liquitex website states that you can use up to 1:4 ratio (20%) of water to gesso to thin, and to use water and the Liquitex Matte Medium in equal amounts if thinning more than 20%. I’ve thinned it way more than 20% using the Tamiya Airbrush Thinner, but I’ve found that thinner gesso tends to get scratched off easily in handling.

Image 1.

I eventually got a bottle of black gesso as well, as I found myself applying a coat of black ink wash to grey gesso-primed miniatures when I absolutely needed a black basecoat.
Here are my supplies for making primer mix — Gesso, Delta Ceramcoat craft acrylic black paint (99 cents at the local craft store), Tamiya airbrush thinner in a dispenser bottle, and of course, a mixing pot:
Image 2.
The following image shows the progression of mixing gesso: first you start out with a dollop of gesso (the quantity obviously depending on how many miniatures you are going to prime!), then add black paint, then add thinner or water and mix thoroughly, and finally, you have a nice, shiny, smooth solution of primer, ready to use.

Image 3.
Here are two pictures of the Lord of the Rings plastic Warrior of Minas Tirith figure, before and after priming with gesso:

Image 4.

Image 5.
When applied, gesso goes on thick and obscures details, but as it dries, it shrinks down and goes on flat. In fact, it works so well that you can apply it directly to prepainted figures with no loss of detail (this would obviously depend on how thickly the paint was used in painting the figure):

Image 6.

Image 7.
Another nice thing about working with gesso is that you have absolute control over how it’s applied. Put it on too thickly?

Image 8.
No problem! Just use the brush to wipe away the excess. Much easier, cleaner, and safer than trying to damage-control over-applied spray can primers.

Image 9.
… notice how gesso obscures details above when it’s wet. It dries down to reveal the details:

Image 10.
Here is a comparison photo showing gesso-primed plastic gun (above), and before priming (below):

Image 11.
Here’s a picture of a white-gesso-tinted-with-black primed metal miniature, from the Dark Age line of figures. The leftmost one is primed with gesso, then baremetal, then a figure primed with Tamiya spray can grey primer:

Image 12.
Click here to view larger version (1800×1123, 407KB)
… and a closeup of the gesso-primed miniature:

Image 13.
Click here to view larger version (1200×989, 271KB)
When the leftover gesso dries, it peels off in one rubbery piece:

Image 14.
One note about gesso safety. Apparently, some brands of gesso come with carcinogenic warning labels. The Liquitex brand I use is certified non-toxic, including meeting the California Proposition 65 requirements. Here’s the blurb from the MSDS (Material Safety Datasheet) for their gesso:
“Product has been certified as non-toxic by The Art and Creative Materials Institute, Inc. and conforms to ASTM D-4236 Standard Practice for Labeling Art Materials for Acute and Chronic Adverse Health Hazards.”
There you have it. Obviously, if you have hundreds of figures to prime at once, or if you are working with smaller models (say 10mm and smaller) where any kind of primer might obscure details, it may not work for you. But if you are looking for a safer, use-at-any-time method of priming your miniatures, give gesso a shot!
Added: January 17, 2007
Over on TMP, there is a thread going on about using gesso as primer. As regular visitors of WeeToySoldiers may know, I’m a big fan of using gesso for priming figures for many reasons, not the least of which is that I like to paint late at night, which effectively precludes using spray can primers.
One poster, a user of gesso, commented to the effect that you don’t really need to add water or otherwise thin gesso. His exact words were “jam the gesso into the crevices and glop it on. Dries perfectly thin.” This piqued my interest, as well as (it must be admitted) a dose of skeptism. I’ve always thinned my gesso, and have gotten good results with it. Oh sure, usually you have to go back and touch up where gesso shrank and created bare “pinhole” spots, but that’s easily done (gesso shrinks as it dries, which makes it an ideal primer, as there is no or minimal loss of details). Thinned gesso also seemed more prone to being scratched off or otherwise damanged in handling, but I attributed that to just “gesso being gesso.” To be sure, painted figures that were primed with gesso seem to wear handling just fine.
So, my curiosity being aroused, I decided to experiment with non-thinned gesso, straight from the bottle, and furthermore, to “glop it on” and see how it’d dry. For the experiment, a brave Urban Mammoth Junkers Convict Legionary “volunteered”:

Image 15.
Here’s my black gesso, a Liquitex brand variety:

Image 16.
… and here’s the gesso, straight from the bottle. I actually ended up using about 3x that amount, as I applied it rather liberally!

Image 17.
Now, here are the pictures of the experiment in progress. First, we have the Legionary with its side and front profiles:

Image 18.
Here the gesso has been applied. Notice the complete loss of details! I had to edit the image to overexpose the shots, to draw the details out.

Image 19.
Some people say to let gesso dry for 24 hours before painting over them. I don’t know if that really makes that much difference. I’ve painted over gesso-primed figures after as little as a few hours, and have had no negative results, but I can’t say conclusively that you have to or don’t have to wait X number of hours.
Anyway, here’s the figure, two hours after the gesso was applied:

Image 20.
Well, I do stand corrected! It seems pretty amazing that all that gesso dried up and shrank, but it does seem to appear that that’s the case, doesn’t it? There’s a pinhole bare spot on the shield that I’ll need to touch up, but the shrinkage-induced bare spots are far, far fewer and smaller than when I use thinned gesso. Well, how about that!
The next two pictures show comparison shots of the head area, and the shield details:

Image 21.

Image 22.
I’d be interested in hearing about your gesso techniques and habits!
Added: February 25, 2007
Watching Paint Dry.
Well, actually, not paint, but gesso.
The section above on using non-thinned gesso has turned out to be quite popular, judging from the website statistics. A common refrain I see that it’s almost unbelievable how much gesso manages to shrink as it dries.
Well, wonder no more. Here’s an interesting time-waster for you to enjoy — a series of photos of gesso drying on a miniature! Thanks to the intervalometer setting on my digital camera, this was achieve with minimal fuss and also with far greater precision than anything I could’ve managed manually.
Basically, I set up the camera to take 100 photos in sequence automatically, one every minute. Then the figure was primed, and the camera activated. So we went from:

Image 23.
… to this…

Image 24.
… to this:

Image 25.
… and you get to see it, each step of the way!
There are two ways to view it. The first is a vertically scrolling webpage with the 100 photos (actually 101, including the shot of the figure before it was primed) in sequence. You can see that by clicking on the image below:

Image 26.
The other method requires you to have Javascript enabled on your web browser. It’ll launch a new window, in which the 101 photos will display in sequence as an animation. The default setting is for image to change every 0.5 seconds, but that can be adjusted by you during the playback (”500″ is 0.5 seconds, so if you want one second delay, type in “1000″ and click on “Change Interval” button; “250″ for 1/4 second, etc.). There’s a 3-second pause before it’ll loop again once it reaches the end of the animation.
Click here to see animation of gesso drying.
Hope you found this interesting!
Added: February 27, 2007
Here are some finished miniatures that were primed with gesso.
The LotR High Elf Warrior and the Ultramarine sergeant were primed with gesso; the Imperial Fists marine in the middle was spray-can primed.

Image 27.
Night Goblins from The Battle for Skull Pass set, primed with gesso:

Image 28.
Dwarf Miners from the Skull Pass set, primed with gesso:

Image 29.
Skull Pass Dwarf Thane, again primed with gesso:

Image 30.

Image 31.
Skull Pass Dwarf Warriors (can you tell what I’ve been working on lately…)

Image 32.
History of changes:
September 19, 2005 — article posted online.
October 26, 2006 — general content addition, including spray primer hazards, non-toxicity of gesso, and thinning gesso. Added external links to the Liquitex gesso product information page, and its MSDS (Material Safety Datasheet) page. Added two pictures of a gesso-primed metal miniature. Changed the article title from “Acrylic Gesso as a Primer” to “Priming with Acrylic Gesso.”
January 17, 2007 — Added test results of applying non-thinned gesso straight from the bottle.
February 25, 2007 — Added 100 sequential photos of gesso drying. Yep, watching paint dry!
For more information:
Comments Off on Priming With Acrylic Gesso, by WeeToySoldiers
Posted in gesso, hobby, primer, tutorials, Uncategorized

Rackham scenics

Mega Miniatures pack 01

Mega Miniatures 02
Featured here are a couple recent arrivals: two packs of (legal) Grenadier recasts from Mega Miniatures and one blister pack of Rackham’s treasure chests. I purchased both on eBay.
The Rackham sculpts are fantastic per their old standards. These scenic packs are hard to come by lately. This was the last I needed to complete my collection of the Rackham scenics. (Actually, the resin kits are tempting, but I may just try to make my own.)
The Mega Miniatures Grenadier recasts are fantastic. I am really excited about these. I purchased a total of 20 (for now) to serve as “dungeon explorer” counterparts to my growing collection of Otherworld monsters, vermin, demons, and giants. If you are even a passing fan of the old 25mm stuff, I cannot recommend Mega Miniatures enough. The price is superb, the recasts are fantastic, the alloy is great, and the nostalgia factor is unparalleled. I will upload a few pictures in a future post.
Comments Off on Orders Have Arrived
Posted in Uncategorized
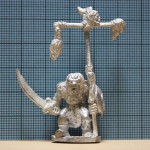
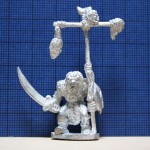
I‘m working on a small “studio” that I’ll use to take pictures of my miniatures when size/scale is relevant to the discussion. I’m a bit fed up with searching the Web for photos that demonstrate the size of a given model as accurately as possible. This is especially problematic at the smaller scales such as 6mm, 10mm, and 15mm, since the size of race-specific models not only varies depending on the manufacturer, but because most of the representatives for such companies apparently don’t have enough time to take photos of their products. I want to make a contribution to the community to alleviate this problem that makes so much of us hesitate to invest in a certain range. I’d also like to quell certain rumors about how so-and-so’s range will never match right with such-and-such a line, etc.
I’ve had the materials to build this studio for several months, but finally broke out the saw and hobby knife this evening. Nothing is finalized yet, but I finished the studio enough tonight to take a few test pictures. Featured here are photos of a Mirliton goblin standard with the two prototype background colors. I want colors that show off the model well, but also make it easy to gauge the size. So far, I am pleased with the results.
I should mention that Artizan inspired me to use dark blue as one of my background colors.
Comments Off on A MATTER OF SCALE
Posted in Uncategorized


